The Home Assistant companion app for macOS have several features that you can use with Home Assistant. For example, you have sensors like the active sensor, which checks if the Mac is actively being used. If you have a MacBook, you have battery sensors that track the battery state and the battery level. The list of sensors pretty much goes on. You can also create automations in Home Assistant to send notifications to your Mac. Apart from this, the companion app also integrates with the Shortcuts app. So, you can have shortcuts that send data to Home Assistant and trigger automations.
Table of Contents
In this guide, we will install and configure the Home Assistant companion app for macOS. Then, we will look at some of the available features, like device sensors, actions, and notifications. Last but not least, we will set up some automations in Home Assistant, so you can have a better understanding on how to get the most our of the companion app for macOS.
Installation and configuration
To install the Home Assistant companion app, you can do it directly from the App Store. After you install it, you will need to connect it to your Home Assistant instance. So, open the companion app. In the welcome screen, click on Continue. The app will scan your network to locate your Home Assistant instance. However, if it doesn’t find it, you can enter the Home Assistant IP address by clicking the button at the bottom.
NOTE
If you have to manually enter the address for your Home Assistant, make sure that you add http:// at the beginning and port 8123 at the end.
After selecting your Home Assistant instance, a pop-up window appears where you will need to sign in. After that, click on Continue and the companion app is ready to go. If you go to Settings, Devices & Services, the Mac will now show under the Mobile app integration. Click on it, and you’ll see all the available sensors from your Mac that you can use with Home Assistant.
Companion app Preferences Menu overview
To access the available settings, in the menu bar, click on Home Assistant and then Preferences. On the General tab, you can select to have the companion app launch when you turn on your Mac. You can also select if you want to have the app on your Dock or the Menu bar.
If you have more than one Home Assistant instance, you can go to the Servers tab and add additional instances. Just click on Add Server, and the companion app will start searching for any other Home Assistance instances in your network.
Under the Location tab, you can enable and disable location tracking. If you click on Location Permission, it will take you to the System Settings and open the Privacy & Security option. Then, under Location Services, you can allow Home Assistant to determine your location.
Under Notifications, you can enable if you want to receive Home Assistant notifications on your Mac. If you click on Permission, it will take you to the System Settings and the Notifications option. In there, you can then toggle the option to allow Home Assistant notifications.
In the Actions tab, you can create different actions for Home Assistant automations and use them in the widget section in macOS. If you have scenes created in Home Assistant, they will also show here, and they can also be used in the Widget section just like actions. We will go over Actions in more detail shortly.
The Sensors tab shows all the available sensors that you can use. You can then disable any of the sensors that you don’t want to track in Home Assistant. Just click on any of them and then uncheck the Enabled option. There, you can also configure how often the sensors update. However, some sensors will automatically update more often, no matter the time frame.
Actions
Actions are buttons you can set up in the companion app and use in the widget section on your Mac. When you click on an action, it sends an event to Home Assistant, which you can then use that event as a trigger in an automation.
Create an action
To create a new action, click Add under the Actions tab in the Preferences menu. A new action is created and you can click on it to configure it. In the configuration page, you can set up a name, for example, Desk Light, which would be the event name sent to Home Assistant. If you have more than one Home Assistant instance, you can select the server to which you want to send the action. The description text and the icon is what you would see in the widget section on your Mac. You can customize how the action looks in the widget section by changing the background color, text, and icon color.
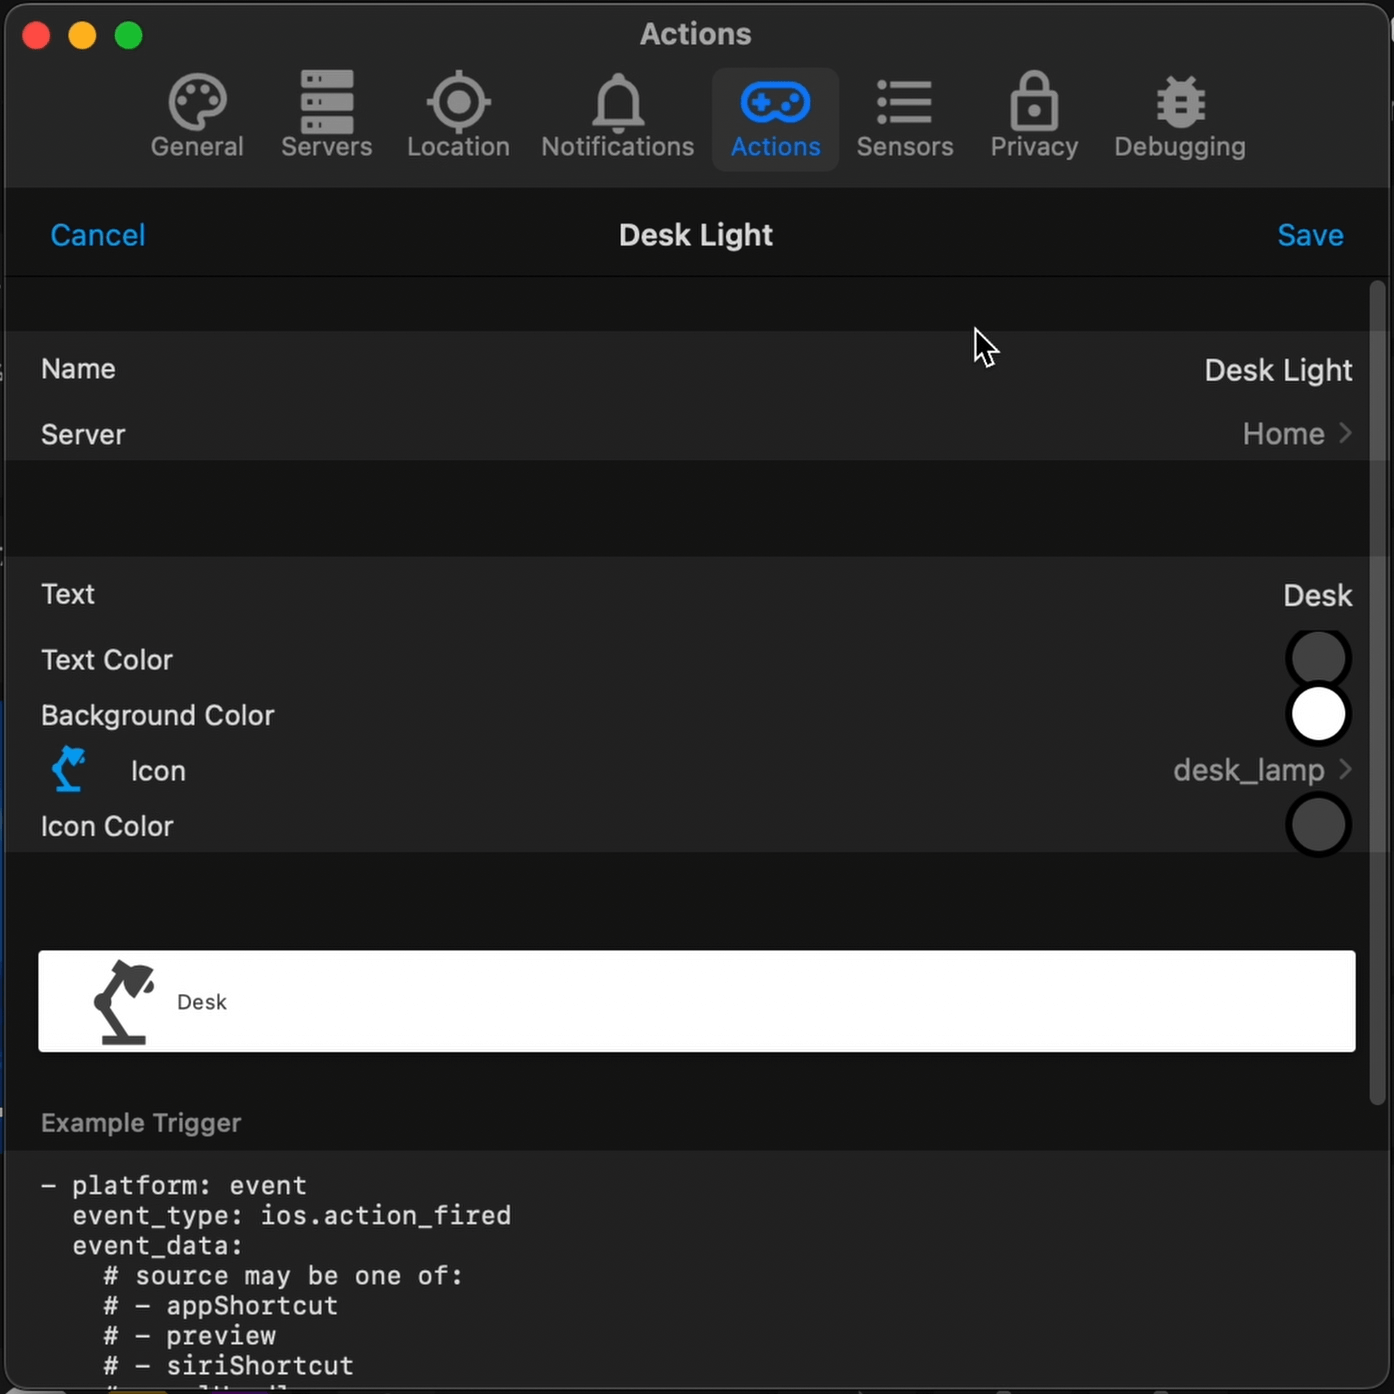
Next, you need to create an automation that will use the event from this action as a trigger. So, in Home Assistant, go to Settings, Automations & Scenes, click on Create automation and then click on Start with an empty automation. Under Triggers, click on Add trigger and select Event. In the Event type, enter ios.action_fired and for the Event data, enter actionName: and within quotes, enter the name for the action. For example, "Desk Light".
Under Actions, add a new action and select Call Service. For the Service, select light.toggle. Under Targets, click on Choose entity, and select the light you want to control, which for this example, it would be desk light. Lastly, click Save, and on the pop-up, set up a name for the automation and click save again.
alias: "Toggle Desk Light with Action"
description: ""
trigger:
  - platform: event
    event_type: ios.action_fired
    event_data:
      actionName: Desk Light
condition: []
action:
  - service: light.toggle
    data: {}
    target:
      entity_id: light.ofc_desk_light
mode: single
Triggering Actions
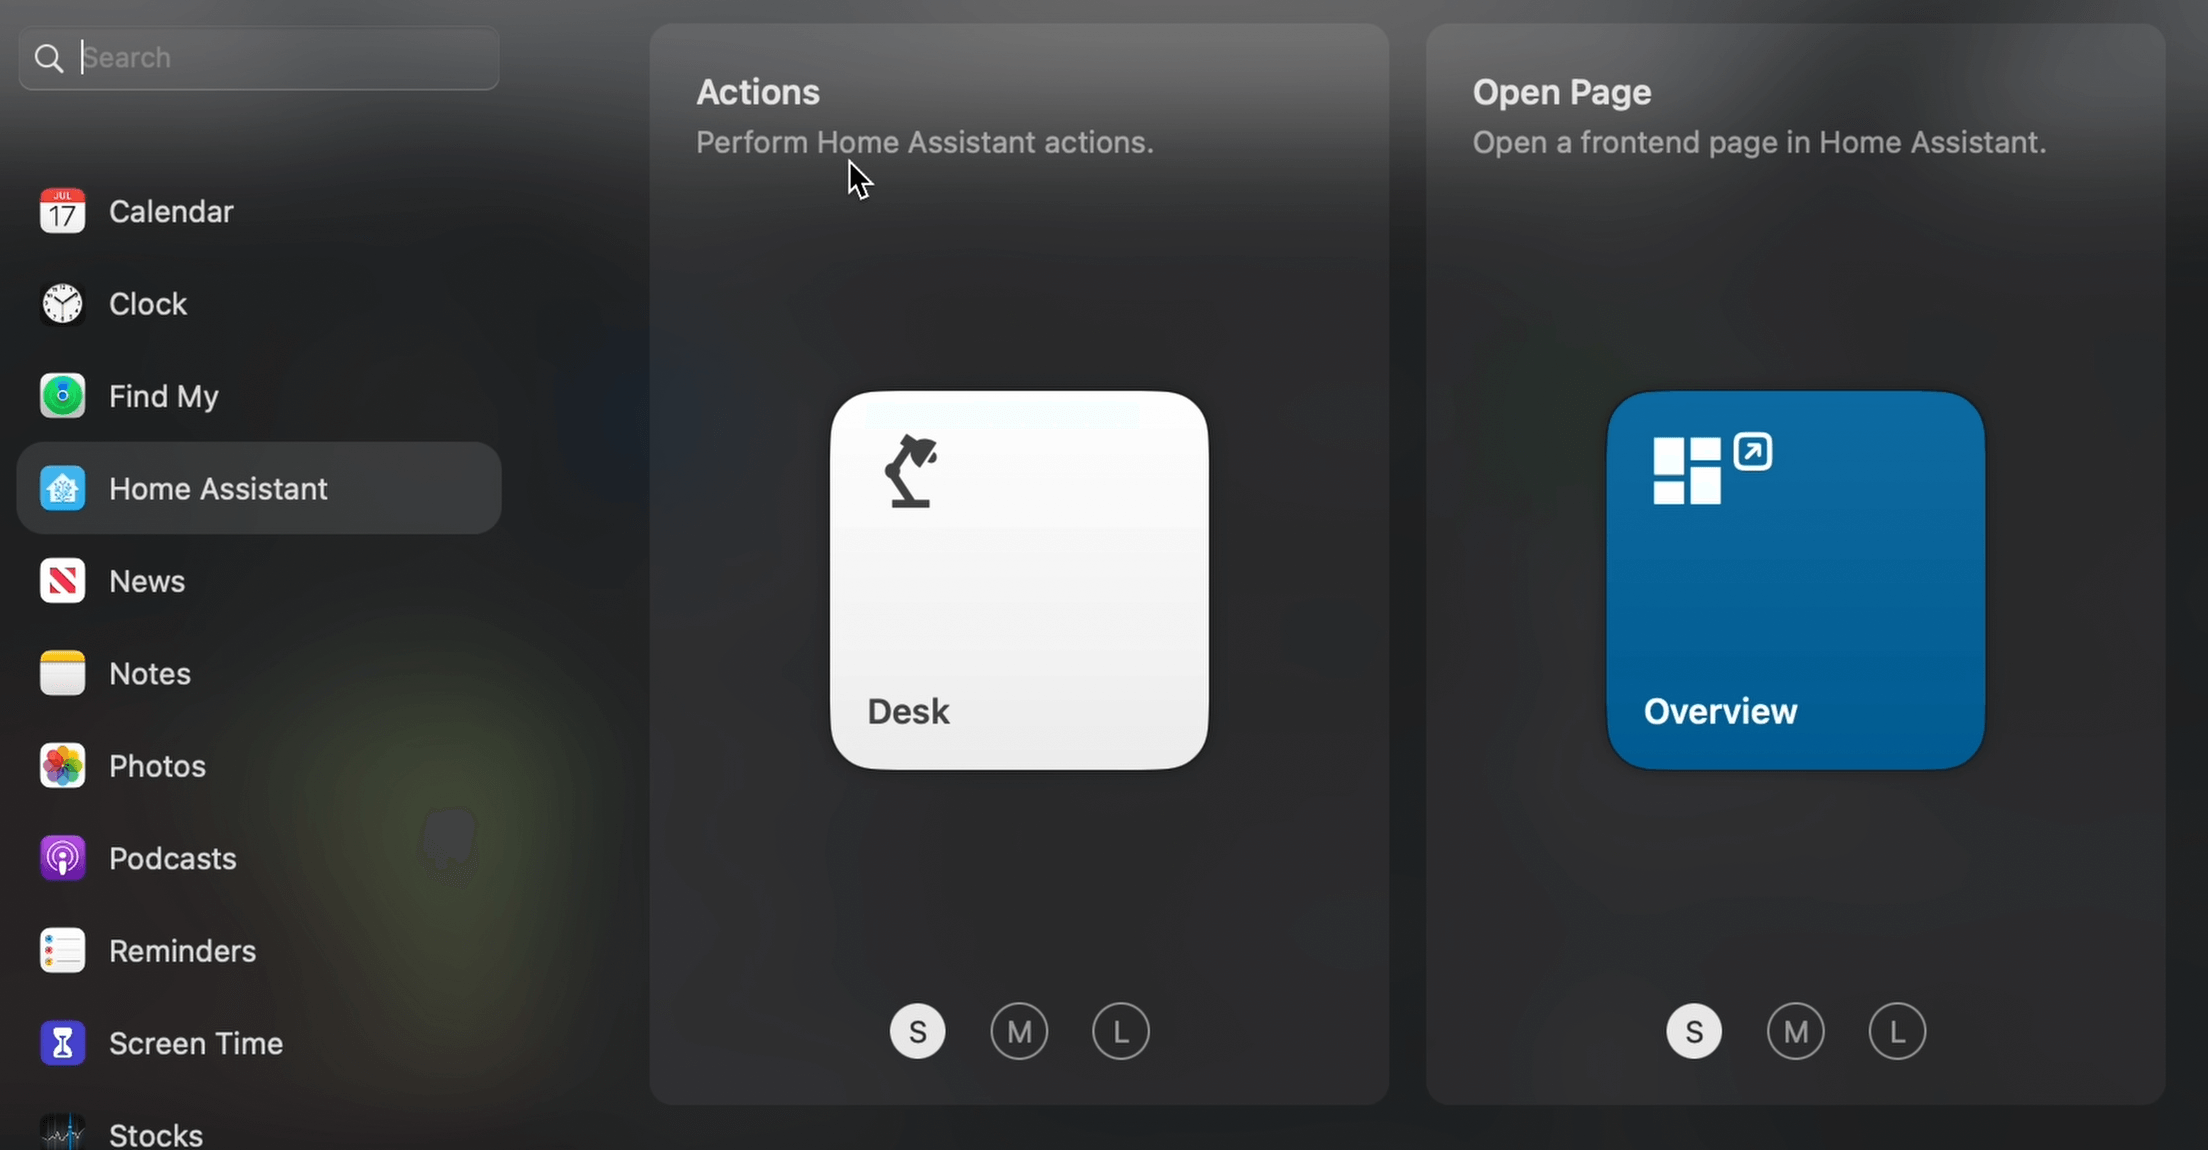
There are 2 ways that you can trigger actions. One, you can click on Actions on the menu bar and see the current actions that you have available. And two, you can add the Home Assistant widget with the action created. So, open the Notification Center and then click on Edit widgets. Click on Home Assistant and under Actions, you can select which size widget you would like to add. After that, just click on it to add it to the Notification Center. If you have several actions created, you can click on the widget to choose which action you would like to see on the widget. If you click on the widget, it will toggle the light on and off.
NOTE
For the action to work when you click on the widget, the Home Assistant companion app will need to be running. Anytime you click on the widget, it will bring the companion app to the foreground. If the app is minimized or not running, when you click the widget, it will open it every time.
Use the Shortcuts app with Home Assistant
A workaround for the companion app window to not open every time you run an action is to use the Shortcuts app in macOS. Instead of creating an action, you can create a shortcut that would run a command in Home Assistant. If the companion app is already running in the background, the shortcut would send the command to Home Assistant and the companion app window won’t open. Another good thing about using shortcuts is that, in some cases, you won’t even need to create an automation in Home Assistant.
Create a shortcut
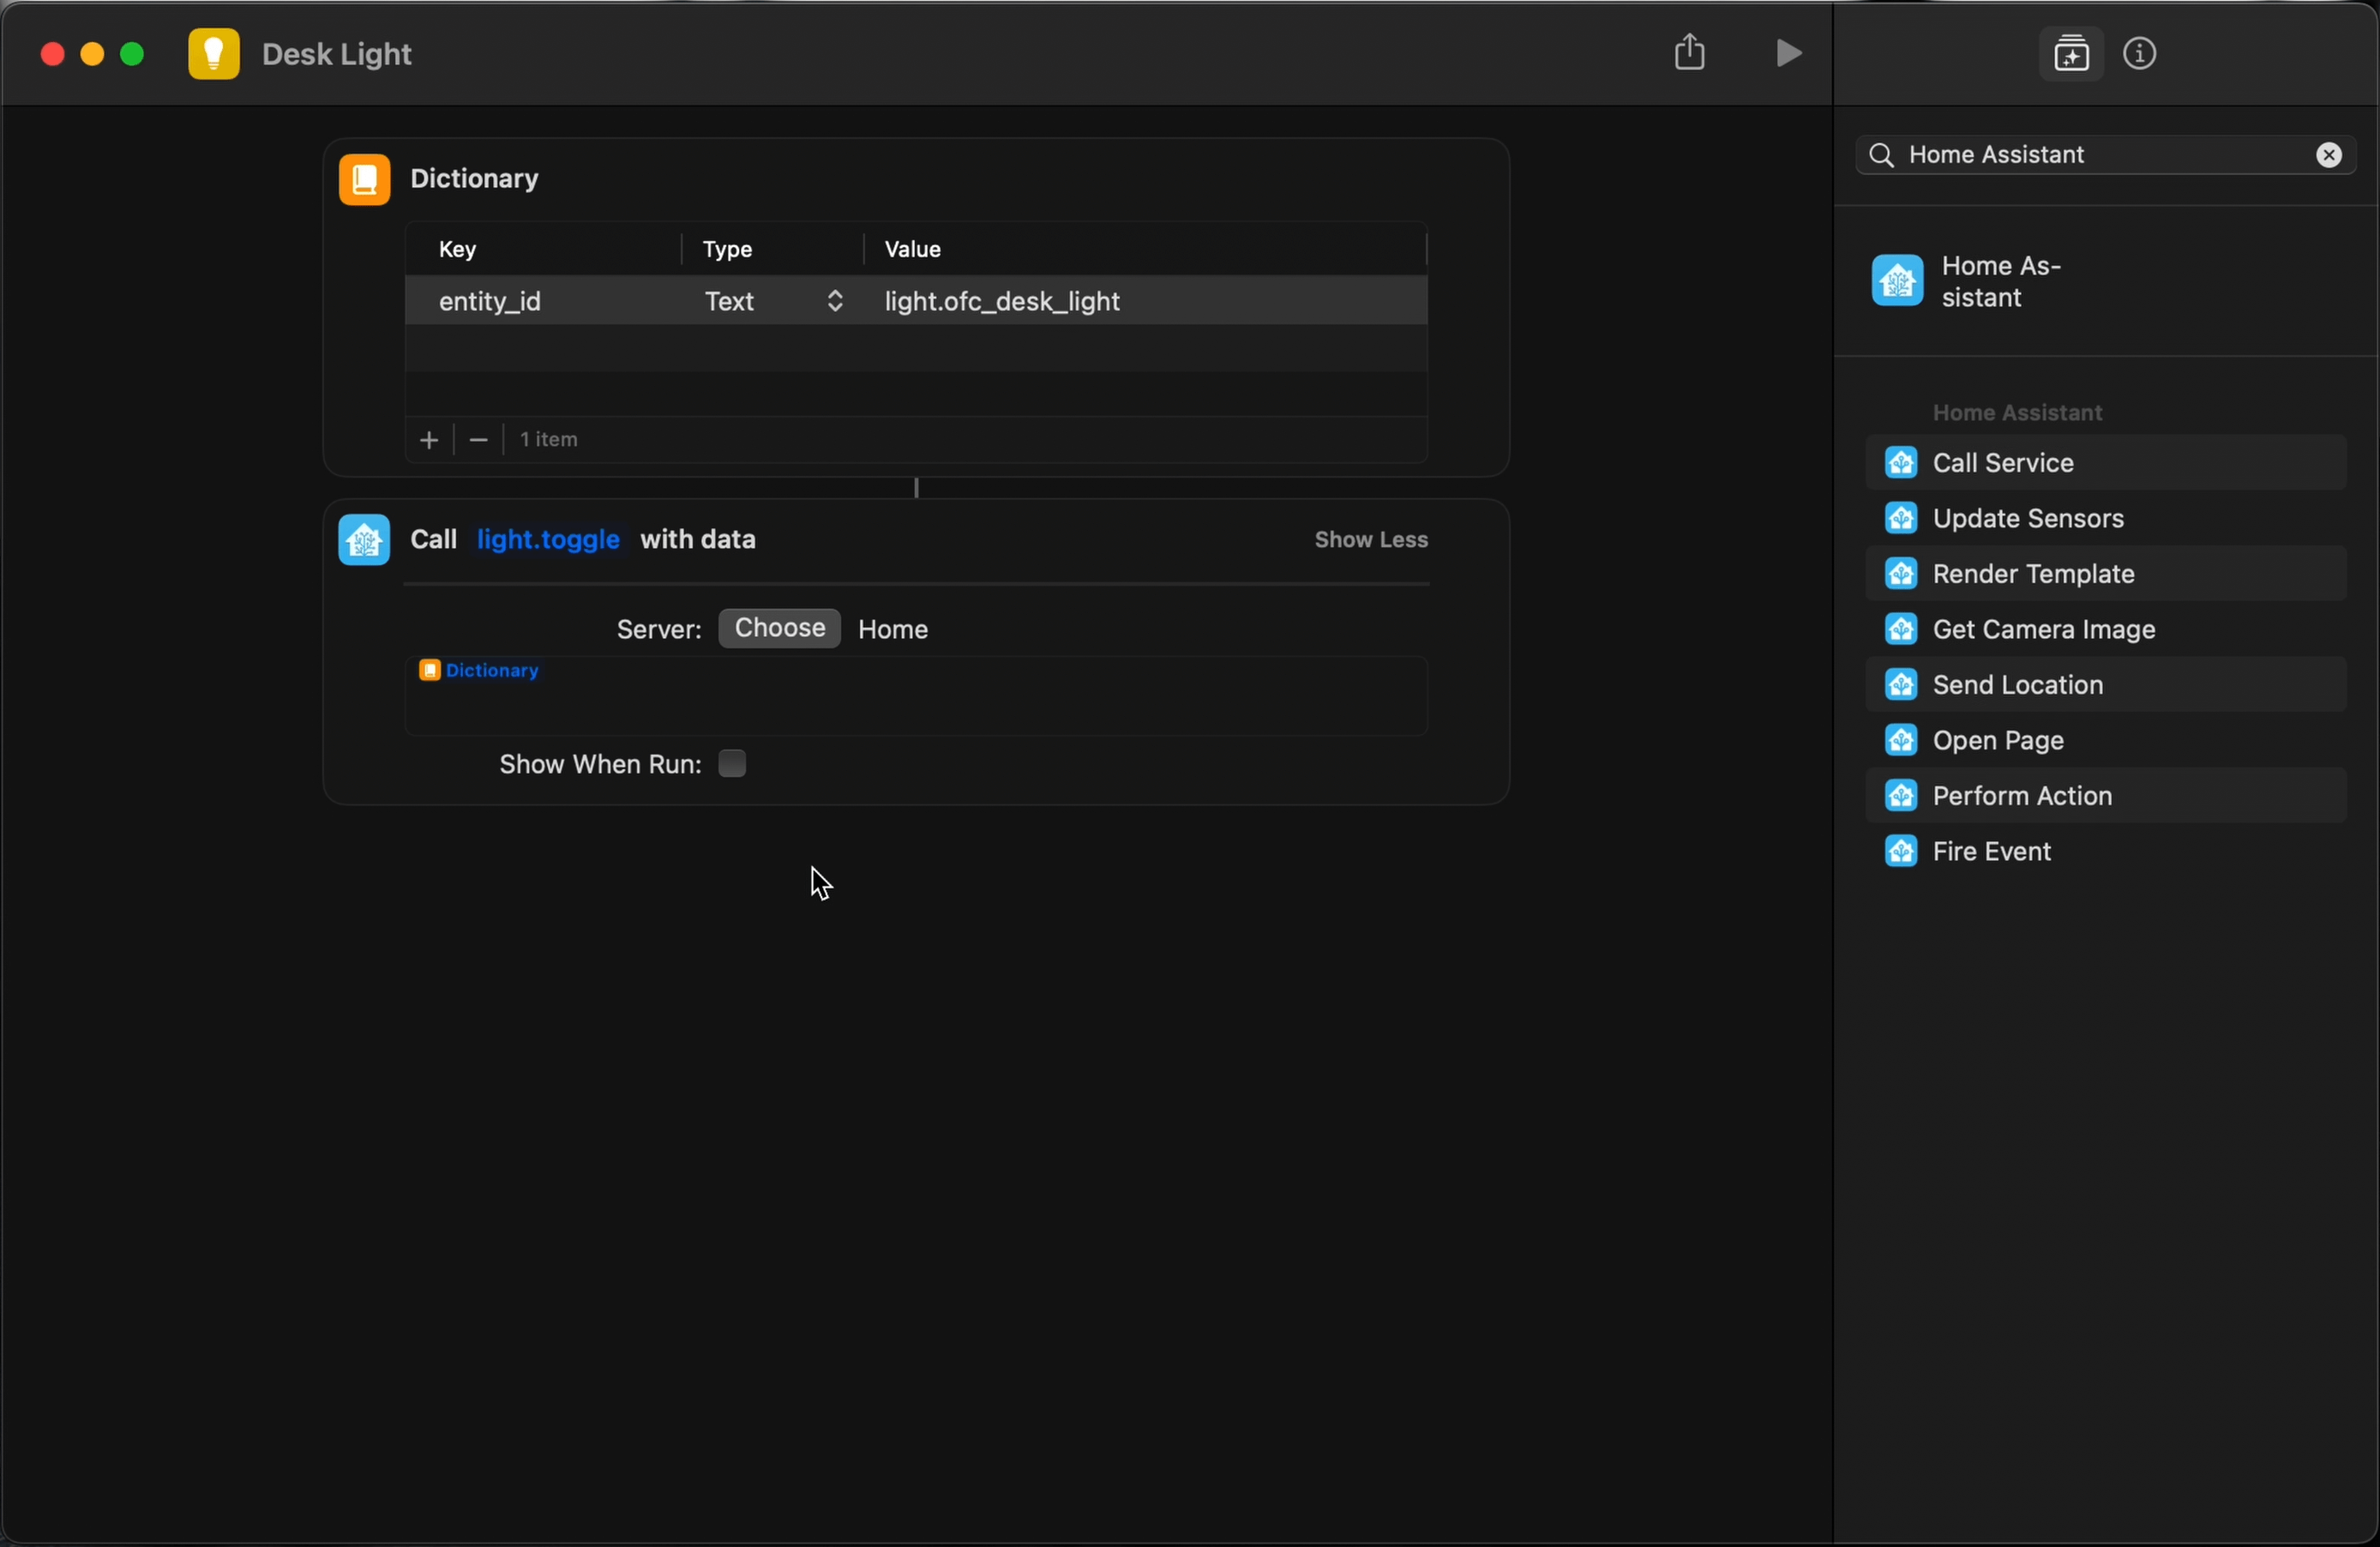
Open the shortcuts app and click on the plus “+” icon to create a new shortcut. At the top, set up a name for the shortcut. Then, click on the icon next to the name and set up an icon and a background. On the right side, you have the Action library. Search for the Dictionary action, drag it to the middle or double-click it to add it. Then on the dictionary action, click on the plus “+” icon. Under Key, type entity_id. For the Type, leave it set to Text and for the Value, enter the name of the entity you would like to control.
NOTE
The information set up in the Dictionary action will be the service data sent to Home Assistant.
Add another action, so search for Home Assistant and add the Call Service action. Click on Service, search for light.toggle and select it. Then, click on Show More. If you have more than one Home Assistant instance, you can choose the correct one under Server. In the Service data field, it has the dictionary action already added. Containing the service data to pass to Home Assistant. Uncheck the option Show when run so you don’t get a notification every time you run the shortcut.
The Shortcuts app doesn’t have a widget for the notification center in macOS. There is a shortcut dropdown menu on the right side of the menu bar. When you click on it, you can see your shortcuts and run them from there without opening the Shortcuts app. To add a specific shortcut to that menu, Click on the Shortcut details icon on the right, and check the option, Pin in menu bar. You’ll have to do this for every shortcut you would like quick access to from the menu bar.
Sensors
The companion app for macOS has several sensors that you can use with Home assistant. One of the Mac sensors that I like using is the Active sensor. This sensor has a few attributes that you can use in automations. For example, the screen off attribute. With this attribute, I have an automation that will turn off my monitor lights when the screen goes off and then turn them back on when I’m back at the computer. There is also the Terminating attribute, which I use on another automation to turn off the monitor lights when I shut down the computer.
Another helpful automation I use is sending notifications to my Mac when someone rings the doorbell. The notification displays an image of who is at the door. I also have a smart lock on my front door, so I added an action that I can click to unlock the door.
Automations with sensors
Toggle desk light on and off based on screen state
Let’s set up the automation that toggles the monitor lights on and off when the computer screen is on or off. In Home Assistant, go to Settings, Automations & Scenes, Click on Create automation and then, Start with an empty automation. Click on Add trigger, and in the dropdown, select the State. Under Entity, search for the binary_sensor.active entity for the Mac. Under Attributes, select Screen Off and set the To state to true.
Then, change the edit mode for the trigger from visual editor to Yaml. The true state is a boolean, so we need to remove the double quotes; otherwise, the automation won’t work. Duplicate the trigger entity and change the To state to false.
Next, under Actions, add an action and select If-then. For If, click on Add a condition and select State. Add the binary_sensor.active entity for the Mac. Set the Attribute to Screen off and the state to true. Then, change to Yaml mode for this condition and remove the double quotes on the true state. Under Then, add an action and select Call service. Set the Service to light.turn_off, under Targets, click on Choose entity and select the light to control.
You also need to add the action that will turn the lights back on when the screen is on, so click on Add else, Add action, and select Call service. Set the service to light.turn_on, and choose the light under Targets. Lastly, click on Save, set a name for the automation, and click Save again.
Now, when you lock your computer and the screen turns off, the monitor lights will turn off automatically. When you are back to the computer and the screen turns on, the lights will also turn back on.
alias: "Toggle monitor lights based on monitor screen state"
description: ""
trigger:
  - platform: state
    entity_id:
      - binary_sensor.ofc_mac_studio_active
    attribute: Screen Off
    to: true
  - platform: state
    entity_id:
      - binary_sensor.ofc_mac_studio_active
    attribute: Screen Off
    to: false
condition: []
action:
  - if:
      - condition: state
        entity_id: binary_sensor.ofc_mac_studio_active
        attribute: Screen Off
        state: true
    then:
      - service: light.turn_off
        data: {}
        target:
          entity_id: light.ofc_monitor_lights
    else:
      - service: light.turn_on
        data: {}
        target:
          entity_id: light.ofc_monitor_lights
mode: single
Turn off desk light when Mac shuts down
Create a new automation, Add a State trigger, and select the binary_sensor.active entity for the Mac. Set the Attribute to Terminating, and set the To state to true. Change the Edit mode for the Trigger to Yaml mode and remove the quotes for the true state.
Then, add a condition to check if the desk light is on before running the action. So, click on Add condition, select State, then select the light and set the State to on.
After that, add an action, set the Service to light.turn_off, and under Targets, choose the desk light entity. Lastly, save the automation, and now any time you turn off your Mac, the automation will check if the light is on, and if it is, it will run the action to turn it off.
alias: "Turn Off Monitor Lights When Mac Studio shuts down"
description: ""
trigger:
  - platform: state
    entity_id:
      - binary_sensor.ofc_mac_studio_active
    attribute: Terminating
    to: true
condition:
  - condition: state
    entity_id: light.ofc_monitor_lights
    state: "on"
action:
  - service: light.turn_off
    data: {}
    target:
      entity_id: light.ofc_monitor_lights
mode: single
Automation with notifications
The last automation I want to show you is the one to have a notification sent to the Mac when someone rings the doorbell. The automation will show a screenshot of who is at the door and an action button to unlock the door.
Create a new automation, click on Add trigger, and select State. Select the doorbell entity, and for the To state, select Detected. Under Actions, add a new action and select If-Then. Add a state condition and set it to the binary_sensor.active entity for the Mac. Then, set the Attribute to Screen off and the state to false. Change to the Yaml editor and remove the double quotes from the false state.
Next, under Then, Click on Add action and select Call service. Set the Service to camera.snapshot. Under Targets, choose the doorbell entity, and for the Filename, enter /config/www/doorbell_image.jpg. This will save the image in the www folder in the Home Assistant Config folder and name it doorbell_image.jpg.
Add another action and select Call service. Set the Service to notify.mobile and select the option for your Mac. Set the Message to, There is someone at the door, and the Title to Doorbell Alert. We also want to send an image with the notification, so under Data, enter image: and the location for the image, which would be /local/doorbell_image.jpg.
To add an action button on the notification to unlock the door, enter the following:
actions:
  - action: unlock_door
    title: Unlock Door
We’ll also need to create another automation that will run the command to unlock the door when we click on the unlock_door action. Lastly, we want to group all notifications from this specific automation, so enter group: and we can name the group doorbell-alert. Click on Save, name the automation and click save again.
Next, create a new automation, set the Trigger to Event, set the Event type to mobile_app_notification_action, and under Event data, enter action: unlock_door. Under Actions, add a Call service action, set the Service to lock.unlock and choose the door lock under Targets. Save the automation, and when someone rings the doorbell and the Mac is on, you will receive a notification with an image of who is at the door, and you will have an action button that you can click to unlock the door.
alias: "Doobell Alert on Mac"
description: ""
trigger:
  - platform: state
    entity_id:
      - binary_sensor.doorbell
    to: "on"
condition: []
action:
  - if:
      - condition: state
        entity_id: binary_sensor.ofc_mac_studio_active
        attribute: Screen Off
        state: false
    then:
      - service: camera.snapshot
        data:
          filename: /config/www/doorbell_image.jpg
        target:
          entity_id: camera.doorbell_cam
      - service: notify.mobile_app_mac_studio
        data:
          message: There is someone at the door
          title: Doorbell Alert
          data:
            image: /local/doorbell_image.jpg
            actions:
              - action: unlock_door
                title: Unlock Door
            group: doorbell-alert
mode: single
Support
As a solo creator, I dedicate my free time to maintaining this site. If you find my content useful, consider supporting the blog—every contribution helps keep the content coming.
Buy me a coffee