In this tutorial, we are going to talk about Z-Wave. I’m going to show you how to integrate it with Home Assistant . We’ll go over some of the USB dongles that you can use. We are also going to add a smoke and carbon monoxide alarm to the Z-Wave network, and lastly, we will create a very useful automation that you can use with this type of device.
Table of Contents
What is Z-Wave?
Z-Wave is a wireless communication protocol mainly used for home automation. It uses the mesh network topology, so any non-battery Z-Wave devices connected to the network will work as repeaters. Z-Wave works under low radio frequencies, so it doesn’t cause interference with your home WiFi. For example, in the U.S., it uses the 908.42 MHz frequency, so it’s not near the 2.4 and 5 GHz frequencies that WiFi uses.
What USB dongles can you use?
Some of the Z-Wave USB sticks that you can use with Home Assistant are the Aeotec Z-Stick Gen 5 , the GoControl HUSBZB-1 , which supports both Z-Wave and also Zigbee. These 2 USB sticks are based on the Z-Wave 500 series. However, there are also the Aeotec Z-Stick 7 and the Zooz ZST10 , which are based on the 700 series Z-Wave.
NOTE
Back on January 17th, Home Assistant reported some know issues with the 700 series, so they recommended avoiding that series for now. However, since then, there have been updates performed to the firmware. At the time of this video, the 700 series is under version 7.17.2, which seems to have resolved the known issues. So if you purchase one of the 700 series USB sticks, definitely make sure that you update the firmware.
The one that I would recommend buying is the GoControl HUSBZB-1 . It is a 500 series Z-Wave stick. However, it supports both Z-Wave and Zigbee, so if you plan to have some Zigbee devices, you won’t have to purchase another USB stick.
Integrate Z-Wave with Home Assistant
To set up the Z-Wave integration, connect the USB stick to your Home Assistant and then Reboot. If you are using Home Assistant in a virtual machine, you must make sure that you pass through the Z-Wave USB stick to your Home Assistant VM.
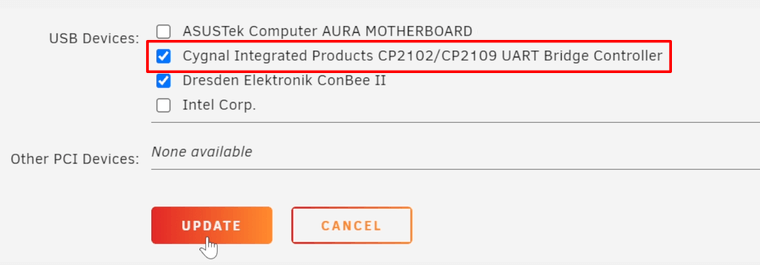
If you are using Unraid like I am, stop the Home Assistant VM and then go to the Edit page. Scroll down and under USB Devices, select the Z-Wave adapter. I have the Aeotec Z-Stick 7, so for me, the name for the USB device shows as Sygnal Integrated Products. Depending on the USB stick that you have, the name might be different. Click on Update and then restart the Home Assistant VM.
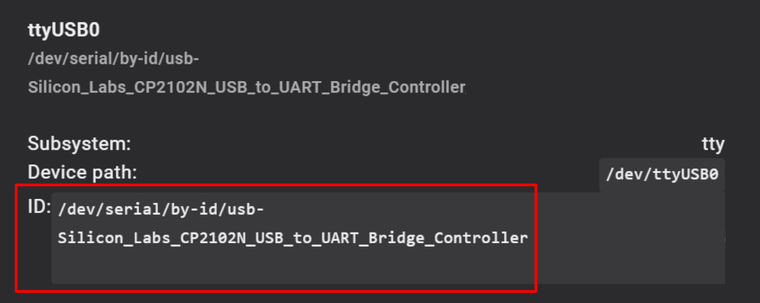
When Home Assistant is back online, go to Configuration, Add-on, Backups & Supervisor, and System. Under Host, click on the icon with the 3 dots at the bottom and click on Hardware. Scroll through the list and locate the Z-Wave stick. Again, the name may vary depending on the device that you have. For the one that I have, it shows here as usb-Silicon_Labs.
Once you locate the USB stick, you want to copy the ID path, which shows as /dev/serial/by-id/. You could also use the device path. However, it could cause an issue if you reboot the machine and the device path changes.
After that, go back to Configuration and click on Devices & Services. If the discovery feature in Home Assistant found the Z-Wave stick automatically, you would see an option at the top to configure it. So, if it did, click on Configure. A pop-up comes up asking if you want to set up the USB stick and also install the Z-Wave JS add-on.
The Z-Wave JS add-on is needed because it allows Home Assistant to communicate with the Z-Wave network via the USB controller. And the integration is used to add and remove devices from the Z-Wave network.
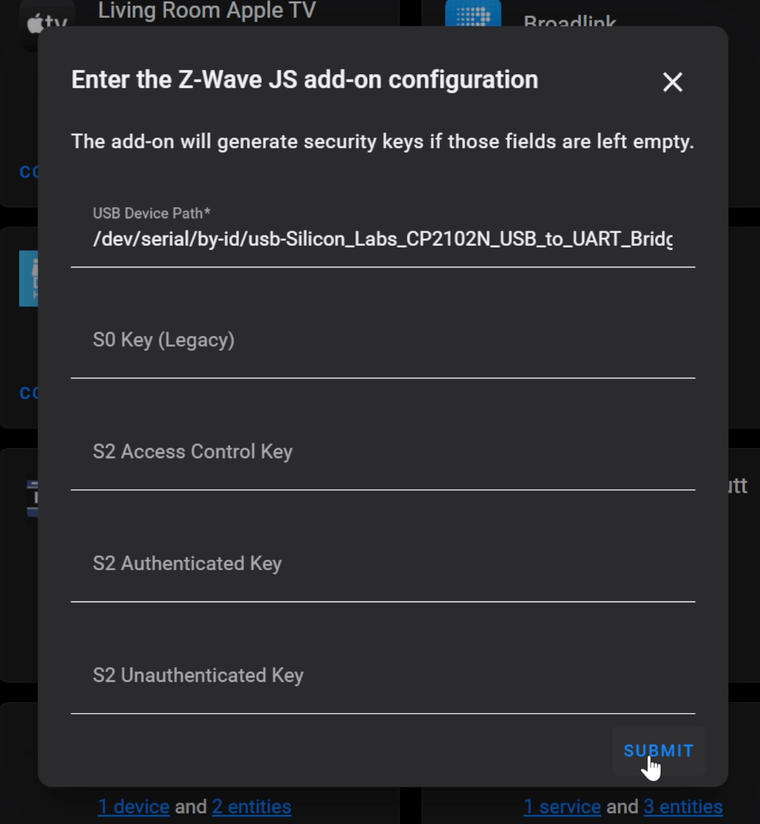
Click on Submit, and after the add-on is installed, another pop-up comes up asking to enter security keys. However, leave it blank, and the Z-Wave JS add-on will generate the keys automatically. Click on Submit, and the add-on will start running. To finalize the setup, add the controller to an area and click on Finish.
If Home Assistant didn’t discover the Z-Wave USB stick, click on Add integration and search for Z-Wave JS. Click on it, and it’s going to ask if you want to install the Z-Wave JS add-on. Leave it selected and then click on Submit. On the next pop-up, enter the path for the USB device and then click on Submit. Lastly, add the USB controller to an area and click on Finish.
Next, enable watchdog in the Z-Wave add-on. So, if the add-on crashes for some reason, the watchdog will automatically restart the add-on. Go to Configuration, Add-on, Backups & Supervisor, open the Z-Wave add-on, and enable watchdog.
Z-Wave is now integrated with Home assistant, and you can now start adding devices to the Z-Wave network. There are a large number of Z-Wave devices that you can add. For example, smart plugs, lights, buttons, weather sensors, and the list goes on.
Add devices to the Z-Wave network
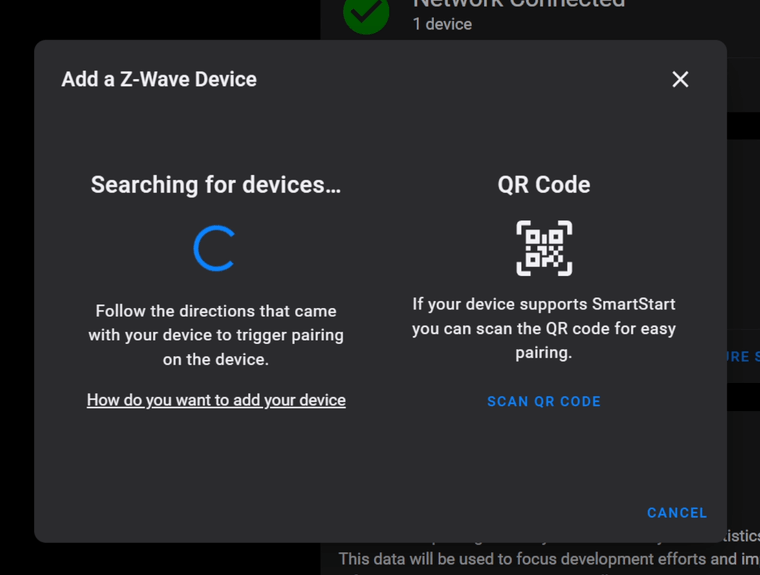
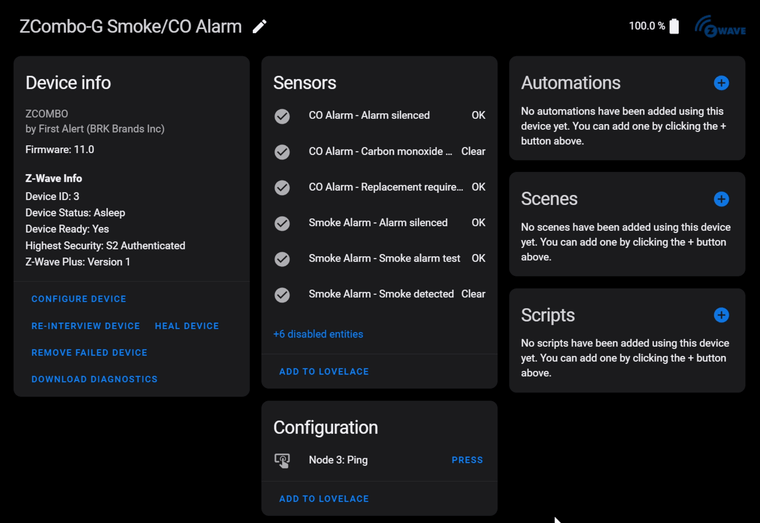
For this guide, I’m adding a smoke and carbon monoxide alarm which is a must to have integrated with Home Assistant. On the Devices & Services page, click on Configure under the Z-Wave JS integration. Then follow the directions that came with your device to trigger pairing mode. Click on Add Device and give it a few seconds for the integration to find the Z-Wave device.
If the device is connecting securely, it will ask you to enter the 5 digit PIN and verify the device specific key. You can find that information directly on the device or on the manual that came with it.
After you enter the PIN, click on Submit, and if everything goes well, the device will be added successfully. Click on View Device, and you can see all the different data you can get from that device.
Set up an automation to notify when smoke or CO is detected
The smoke alarm has 2 binary sensors that you can use in an automation. 1 is for when smoke is detected and the other one when carbon monoxide is detected. So, let’s say that you are not home and there is an issue detected; you could have an automation in Home Assistant send a notification to your mobile device and let you know of the problem.
Also, if you have cameras in your home, you could add to the notification an image of the area where the problem was detected. So, this automation is definitely a must-have so you can take action right away in the event of a problem.
Configuration
To set it up, go into Configuration, Automations & Scenes, click on Create automation, and select Start with an empty automation. Set the name of the automation to something like, Notify when there is smoke or CO detected. Then under Triggers, set the Trigger type to State. For the Entity, search for the smoke detected binary sensor and set the From to off and the To to on.
Next, create another trigger just like this but using the carbon monoxide binary sensor. To make it easy, you can duplicate this trigger by clicking on the icon with the 3 dots and then clicking on Duplicate. In the duplicate trigger, change the Entity to the carbon monoxide detected binary sensor. Everything else, leave it as it is.
Scroll down and under Actions, set the Action type to Choose so you can create 2 conditions. One to run actions when smoke is detected and other actions when CO is detected. Then, click on Add condition and change the Condition type to State. For the Entity, select the smoke detected binary sensor and set the State to on.
Next, create 2 actions. However, the first one is optional. If you have cameras inside your home, you can set an action to take a snapshot from one of the cameras. The second action would send a notification to your mobile device letting you know of the issue, and it’s going to also include the image taken from your camera.
Click on Add action, set the Action type to Call service, and for the Entity, select Camera: Take snapshot. Under Targets, click on Choose entity and select the camera to take the snapshot from.
Next, you need to set up a location where you want to save the image. If you open your Home Assistant Config folder, you should have a folder named www. That will be the folder where you want to save it. So, if you don’t have that folder available, go ahead and create it. Under Filename, enter the path to that folder which would be /config/www. Then enter the name for the image you want to save, so type at the end /living_room_image_smoke_alarm.jpg.
Add another action and set the Action type to Call service. For the Service, search for notify.mobile_app and select the device to send the notification. Under Message, type Smoke detected in the living room, and for the Title enter Smoke Alarm. To send the image from the camera along with the notification, enter the following under Data:
image: /local/living_room_image_smoke_alarm.jpg
group: smoke-alarm
Add another option for when Carbon monoxide is detected. So, click on Add option. Then, Add condition. Set the Condition type to State. For the Entity, select the binary sensor for CO detected and set the State to on.
Next, add an action and set the Action type to Call service. The Service to Camera: Take snapshot. Under Targets, click on Choose entity and select the security camera. After that, enter the following to specify the location where you want to save the image and also the name for the image at the end of the path.
Add another action and set the Action type to Call service. Under Service, search for notify.mobile_app and select the device to send the notification. Under Message, type Carbon monoxide detected in the living room. For the Title, enter CO Alarm. To send the image from the camera along with the notification, enter the following under Data:
image: /local/living_room_image_co_alarm.jpg
group: co-alarm
Here is the complete automation if you would like to copy and past it in the yaml editor for your automation. Just remember to change the entity names to match your entities:
alias: Notify when there is smoke or CO detected
description: ''
trigger:
  - platform: state
    entity_id: binary_sensor.lr_smoke_detected
    from: 'off'
    to: 'on'
  - platform: state
    entity_id: binary_sensor.lr_co_detected
    from: 'off'
    to: 'on'
condition: []
action:
  - choose:
      - conditions:
          - condition: state
            entity_id: binary_sensor.lr_smoke_detected
            state: 'on'
        sequence:
          - service: camera.snapshot
            data:
              filename: /config/www/living_room_image_smoke_alarm.jpg
            target:
              entity_id: camera.lr_camera
          - service: notify.mobile_app_juans_iphone
            data:
              message: Smoke detected in the living room
              title: Smoke Alert
              data:
                image: /local/living_room_image_smoke_alarm.jpg
                group: smoke-alarm
      - conditions:
          - condition: state
            entity_id: binary_sensor.lr_co_detected
            state: 'on'
        sequence:
          - service: camera.snapshot
            data:
              filename: /config/www/living_room_image_co_alarm.jpg
            target:
              entity_id: camera.lr_camera
          - service: notify.mobile_app_juans_iphone
            data:
              message: Carbon monoxide detected in the living room
              title: CO Alert
              data:
                image: /local/living_room_image_co_alarm.jpg
                group: co-alarm
    default: []
mode: single
And that’s about it. Click on Save, and if for some reason you have a smoke alert or a Carbon monoxide alert, Home Assistant will notify you on your mobile device so you can take action right away.
Support
As a solo creator, I dedicate my free time to maintaining this site. If you find my content useful, consider supporting the blog—every contribution helps keep the content coming.
Buy me a coffee